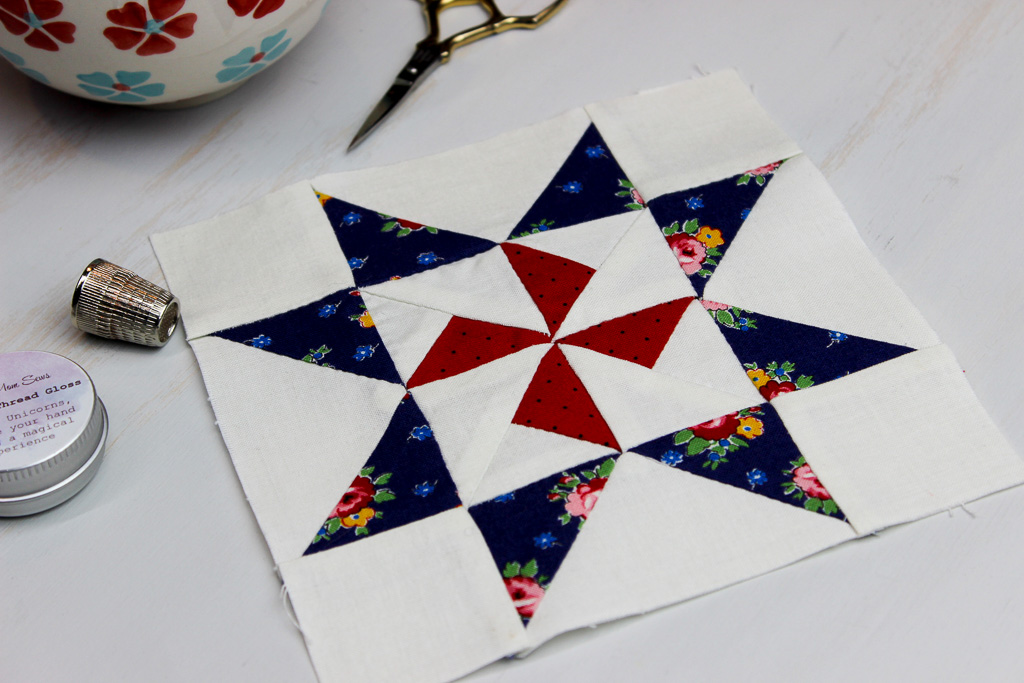
It’s the last block of the Hand Pieced QAL! Can you belive it? Our final block is called Emmeline, because it’s a little bit fancy, just like the character from Friendship Album 1933.
It has been so fun to see all the different versions of these blocks along the way! Thanks for staying with us!

This is a perfect block to complete our quilt–it’s made up of four flying geese units, and little quarter square triangles that actually make up part of a half square triangle. So, we really get to pull out all of our hand piecing skills on this one!
The only tricky part on this block is the center double pinwheel, but no worries–I’ll walk you right through it!

The pieces are small, but that just means that they sew up more quickly. Pin carefully and it will come together with no problems.
Now let’s make our block!

Block size: 6″ finished (6 1/2’’ unfinished)
Notes:
- All seam allowances are 1/4″
- Stitching lines are drawn on the wrong side of fabric and always start and end 1/4″ from the edge of the fabric
- RST=Right sides together
- HST= Half square triangle
- FG= Flying Geese
- QST=Quarter Square Triangle
Materials
- Print fabric:
- (4) 2 3/8″ squares sub-cut in half on the diagonal (side FG units)
- (1) 2 3/4″ square sub-cut on both diagonals (yielding 4 triangles)(center pinwheel)
- Background fabric:
- (1) 4 1/4″ square sub-cut on both diagonals (yielding 4 triangles)(side FG units)
- (1) 2 3/4″ square sub-cut on both diagonals (yielding 4 triangles)(center pinwheel)
- (2) 2 3/8″ squares sub-cut in half on the diagonal (center pinwheel)
- (4) 2″ squares (corners)
Note: If you want to do the “Stitch & Flip” method (follow this tutorial) to make the Flying Geese, these are alternate cutting instructions for the Flying Geese units only:
- Print fabric:
- (8) 2″ squares (side FG units)
- Background fabric:
- (4) 2″ x 3 1/2″ rectangles (side FG units)
Instructions
Note: I draw the stitching lines on all of the patches before I begin sewing them together.
Create the Units
- Make (4) FG units from the print and background fabric (follow this tutorial). Finished FG unit should measure 2″ x 3 1/2″.
- Make (4) “half QST” units from the small print and background triangles (follow this tutorial)–but don’t stitch them into hourglass blocks. You want to make 4 “half QST” blocks. Your finished unit will be a triangle. (See photo below.)
- Make (4) “compound HST units” using the “half QST” units (from step 2) and a background triangle (follow this tutorial).
- Create center pinwheel by stitching together the 4 compound HST units together as shown.


Assemble the Block
- Lay the block out according to the diagram and stitch together in rows.
- Press.

Be sure to click on over to Patty’s blog to see her block as well!
Thanks to Fat Quarter Shop and Famore for sponsoring the block tutorials!


Want to catch up on all the Hand Pieced QAL posts? Click here.
I invite you to join our growing community for the Hand Pieced QAL over on Facebook–it’s a great way to interact with like-minded people and share our love for quilting and hand quilting. Continue to share your blocks–we love to see your creativity!
And don’t forget to sign up for the Hand Pieced QAL newsletter to make sure that you don’t miss any posts!
Pin it for later:


 I’m Kristin, a passionate quilter, sometimes knitter, everyday cook, and cozy home creator. Simple Handmade Everyday is my place to share my love for living a creative, intentional life. Grab a cup of tea and have a look around!