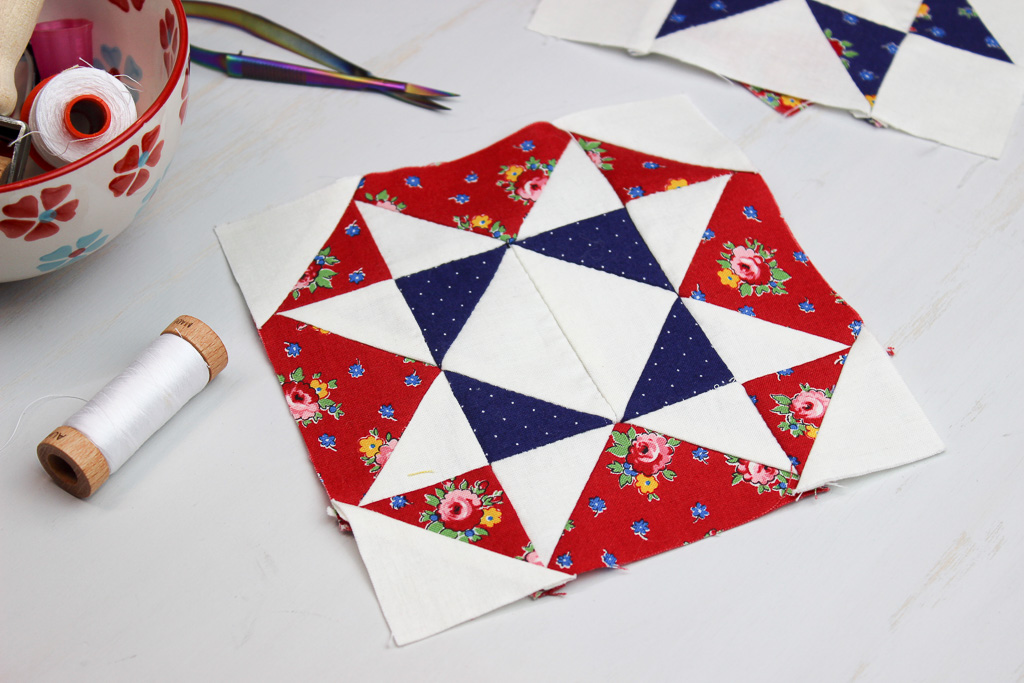
Welcome to week 7 of the Hand Pieced Quilt Along. Patty and I named this block Eula, after the accomplished quilter in Friendship Album 1933. I envy Eula in many ways, but mostly because she makes a mean chocolate cake.
As usual, this block is built entirely from units that we have already covered, the half square triangle and flying geese blocks.


I think the trickiest part of hand piecing this block is where the point of those side flying geese meet the seam intersection of the center unit (which is just two flying geese forming a square in a square unit).

You can see that there is a lot of fabric that comes together at that intersection, but there is really nothing different to do here, but carefully stitch right up to the end of the stitching line and push the needle through the seam allowance–there is just a bit more fabric to hold out of the way as you deal with that intersection.

Make sure to pin carefully and stay consistently on your stitching line.
And check out Patty’s version for a completely different look!
Now let’s make our block!

Block size: 6″ finished (6 1/2’’ unfinished)
Notes:
- All seam allowances are 1/4″
- Stitching lines are drawn on the wrong side of fabric and always start and end 1/4″ from the edge of the fabric
- RST=Right sides together
- HST= Half square triangle
- FG=Flying geese
Materials
- Print fabric:
- (2) 2 3/8″ squares sub-cut in half on the diagonal (corner HST units)
- (1) 4 1/4″ square sub-cut on both diagonals
OR (2) 3″ squares sub-cut in half on the diagonal (yielding 4 triangles) (side FG units) - (2) 2 3/8″ squares sub-cut in half on the diagonal (center FG units)
- Background fabric:
- (6) 2 3/8″ squares sub-cut in half on the diagonal (corner HST units and side FG units)
- (1) 3″ square sub-cut in half on the diagonal (center FG units)
Note: If you want to do the “Stitch & Flip” method (follow this tutorial) to make the Flying Geese, these are alternate cutting instructions for the Flying Geese units only:
- Print fabric:
- (4) 2″ x 3 1/2″ rectangles (side FG units)
- (4) 2″ squares (center FG unit)
- Background fabric:
- (2) 2″ x 3 1/2″ rectangles (center FG units)
- (8) 2″ squares (side FG units)
Instructions
Note: I draw the stitching lines on all of the patches before I begin sewing them together.
Create the Units
- Make (4) HST units from the print and background fabric (follow this tutorial). Finished HST unit should measure 2″ x 2″.
- Make (4) side flying geese units (follow this tutorial). For these units, the print fabric is the larger center triangle. Finished FG units should measure 2″ x 3 1/2″.
- Make (2) center flying geese units (follow this tutorial).
For these units, the background fabric is the larger center triangle. Finished FG units should measure 2″ x 3 1/2″.
Assemble the Block
- Lay the block out according to the diagram and stitch together in rows.
- Press.


Want to catch up on all the Hand Pieced QAL posts? Click here.
I invite you to join our growing community for the Hand Pieced QAL over on Facebook–it’s a great way to interact with like-minded people and share our love for quilting and hand piecing. Please share you progress–we love to see you blocks and support each other’s successes!
And don’t forget to sign up for the Hand Pieced QAL newsletter to make sure that you don’t miss any posts!
Pin it for later:


 I’m Kristin, a passionate quilter, sometimes knitter, everyday cook, and cozy home creator. Simple Handmade Everyday is my place to share my love for living a creative, intentional life. Grab a cup of tea and have a look around!