
Here we are at block 8 out of 9! As I mentioned last week, this month we are tackling curved piecing. We started with some gentle curves with the Emma block.
Our next block in the Book Club Hand Pieced Quilt Along is called Claire.
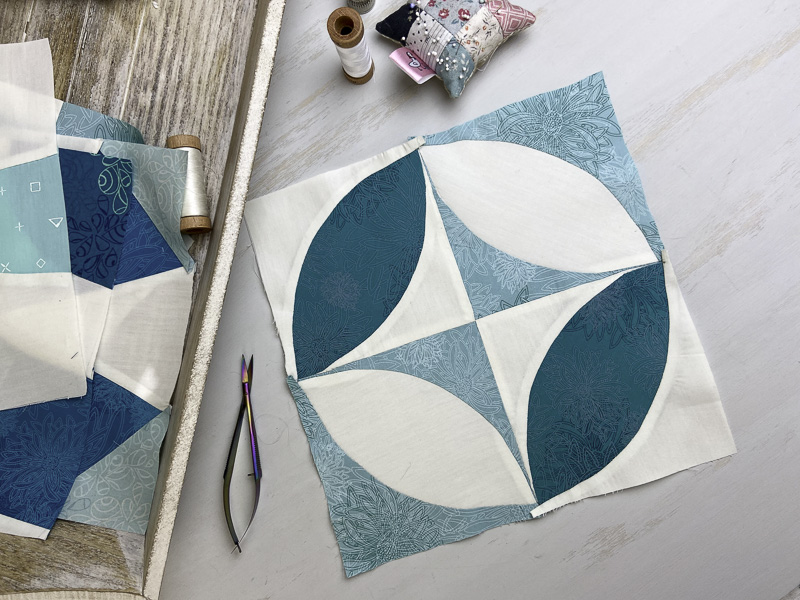
We named this block Claire after the heroine of the Outlander series. Claire travels back in time and let’s just say that her life quickly goes spinning out of control, just like our block.
(Disclosure: This post may contain affiliate links, which means I make a small commission if you buy from them, at no additional cost to you.)
Block Construction
You are definitely going to want to use the templates for this block! Those curved pieces demand it. Check out this video for tips on creating templates.
I’m not going to lie–I found Claire…challenging. There a lot of curves in this block, so stay strong and use that iron to press things into submission, if you have to!
Playing with color placement is fun with this block–there are so many different ways you can go! As a matter of fact, the photos at the beginning of this post are different than the ones at the end! I made Claire more than once and changed my mind about color placement the second time around.


Once you’ve decided on colors and cut out your pieces, lay them out so you can get an idea of what your block will look like.
We will tackle the four units one at a time. The key to sewing curves is marking them correctly. Check out my video tutorial for hand sewing curves to see everything thing you need to know about marking and sewing curves.
Start by folding the convex piece (the leaf-shaped piece) in half and finger pressing the mid-point. Some people leave it at finger pressing, but I like to make a small pencil mark.

Then fold the pointy end of the convex piece to the center point, finger press and mark. Repeat with the other side, so that you have the unit market in three places.
Repeat with the concave piece.

Then it is simply a mater of matching up those markings. Match the center points as shown below and pin. Then continue to match and pin each mark.

I like to go back and place a pin in between each of those marks as well. Since you are sewing two different shapes together, I think the more pins you have to keep things in place the better!

I usually like long pins, but sewing curves has turned me into a short pin convert! I love these short applique pins from Clover.

Once things are pinned securely, just stitch in the usual way. I find that trying to sew with slightly smaller stitches helps that curve come out smoother.

I usually wait until I’ve finished a whole block before I press it, but with curves, I get better results if I press as I go. My little wool pressing mat and Oliso mini iron make a perfect portable pressing station.

Make sure that you check out Patty’s beautiful block. She’s also got a great tip about over cutting the convex piece for easier stitching and then trimming to size.
The Book Behind the Block

Outlander is a fun adventure/romance series. I don’t think I’m spoiling anything by saying that Claire goes back in time and in her quest to get home finds herself in some interesting situations–including falling in love with Jamie from that time period. I love a good historical fiction story and learned a lot about the Scottish Highlands and the Jacobite rebellion from this series. Warning: it’s a VERY steamy book/series, so be mindful of that if it’s not your thing. But if you love it–you are in luck! There are ten books in the series for you to enjoy!
Looking for the Book Club: A Hand Pieced QAL pattern?
HAND PIECING RESOURCES
Check out the whole Hand Piecing Basics video playlist on YouTube.
Patty has many written tutorials from the original Hand Pieced QAL.
STAY IN TOUCH
- Join our Hand Pieced Quilt Along Facebook Group
- Subscribe to our newsletter
- Follow Simply Everyday Handmade and Elm Street Quilts on Instagram
Pin it for later!

