I’m so excited to get this Machine Quilting Blog Hop started! If you don’t know what I’m talking about, read this. I’ll wait 🙂
The first thing I did was to assemble the basics: The book The Ultimate Guide to Machine Quilting, a Supreme Slider (optional, but oh so helpful), Machingers quilting gloves (sorry they are so dirty!), the darning foot for my machine, and my favorite thread–Aurifil 2311.

I should confess right now that I don’t have an ideal quilting set up. Like many of you, I’m sure, I sew at the dining room table. I have a Sew Steady extension table for my Baby Lock sewing machine and I actually sit on a yoga bolster to get to a comfortable height when I quilt. So, there is no high-end sewing machine sunk into a custom-fit cabinet for this girl (maybe someday?).
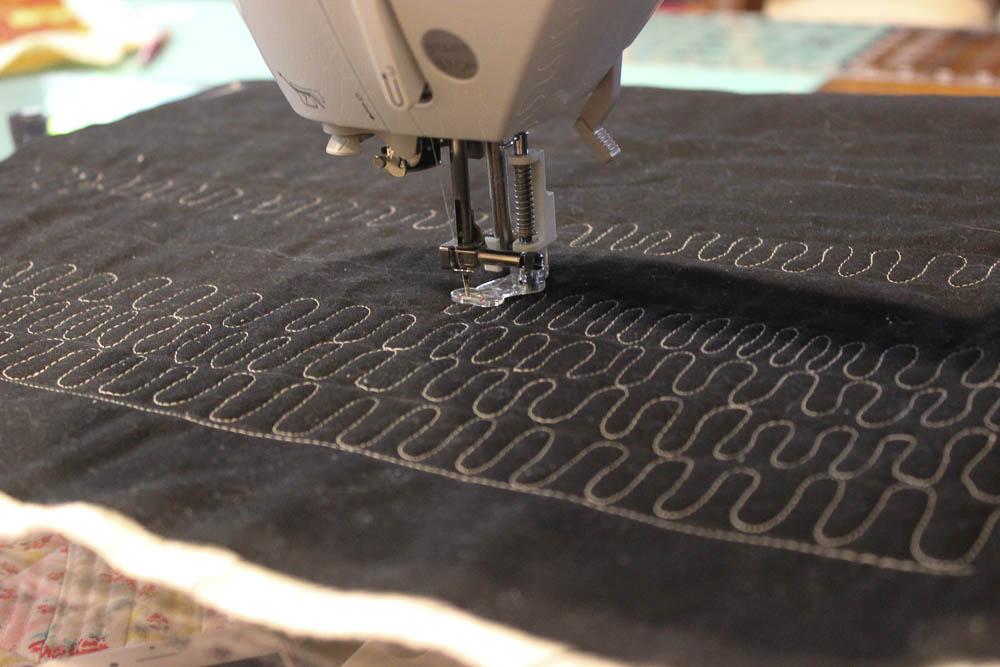
This first week is all about filling horizontal or vertical spaces with quilting. I created a couple of practice pieces with some stash fabric and just spray basted them. I used black fabric because 1. I have a lot of it and 2. the stitching would show up well on it. I probably won’t do that again because boy, it does not photograph well! So please excuse all the lint on these pieces that I did not actually see in real life. Also–one last tip: wind a whole bunch of bobbins!

I drew some long lines with a chalk pencil on the fabric to create different sized channels to quilt in.

First up was a simple, curved switchback motif–not too hard, even for me.

We then moved onto a freehand zig zag. I’m still holding my own, in my opinion. I’m thinking, “I can do this–I’m not actually that bad.”


Then I moved onto square chains. Hmmmm. These were not as hard as I expected–and if I had done this with a blending thread, it could still be passable. I practiced these for a while using two different techniques. But you will have to get the book to find out what they are 🙂 You can see them a bit in the photo below.
Onto the spirals! Hold the phone. These are not as easy as they look. I learned quite a few things with this design. First, I was doing them in a channel that was too big to start with. Smaller was definitely easier. Also, I realized that I was focused on the edge of the darning foot and not the needle as I was creating the spiral. This resulted in me not filling the entire space at first. Once I started focusing on where the needle was, I was able to fill the entire channel with quilting. I also realized that I wasn’t filling in the spiral enough at first. They started to look better when I filled them a little more densely. I still won’t win any quilting awards with this design, but I see definite improvement and again, if it had been done with a blending thread, I think it would create a lot of nice texture.


I will admit, that putting my amateurish quilting out there is a bit out of my comfort zone–but I’m encouraged with my progress. I really need to spend an evening creating a big pile of practice pieces so that I can spend just 10-15 minutes a day improving my skills.
So, how about you? Are you following along? If so, don’t forget to share on Instagram: #machinequiltingbloghop
Also–any advice? I’d love to hear it! Just leave it in the comments.
Lastly, don’t forget to visit the other bloggers who are quilting along!
HollyAnne at String and Story
Vicki at My Creative Corner3
Jen at Quiltin’Jenny
Or just click the image below to get all the links.

This looks amazing! Keep up the great work!
Great quilting – and if it was a big quilt and washed you would love it even more. Soooo much texture. I’m going to follow along using my HQ Fusion Longarm. ?
Hi Kristin!
I think your spirals look great! Great job on sharing. There’s absolutely nothing to be afraid of. The community is very supportive. Just keep on learning and practicing!